TL;DR
This tutorial guides you step by step to configure permissions and secure Claude Code on your machine. You will learn how to choose the right permission mode, define allow/deny rules, enable sandboxing, and protect yourself against prompt injections. Total duration: approximately 25 minutes.
This tutorial guides you step by step to configure permissions and secure Claude Code on your machine. You will learn how to choose the right permission mode, define allow/deny rules, enable sandboxing, and protect yourself against prompt injections. Total duration: approximately 25 minutes.
Permissions and security in Claude Code form the foundation of any reliable use of this command-line AI agent. Claude Code offers four distinct permission modes, a native sandboxing system, and granular rules in settings.json to control every action. over 67% of incidents related to AI agents stem from misconfigured permissions.
What are the prerequisites before configuring permissions?
Before starting, verify that your environment meets these conditions. You will need Node.js 22 or higher and Claude Code v2.1 minimum installed on your machine.
- Node.js >= 22 installed (
node -v) - Claude Code >= v2.1 installed (
claude --version) - A terminal with shell access (zsh, bash)
- A text editor to modify
settings.json - Approximately 25 minutes of your time
If you have not yet installed Claude Code, consult the installation and first launch tutorial that covers each step in detail.
# Check your versions
node -v        # v22.x.x expected
claude --version  # v2.1+ expected
In practice, 90% of configuration errors come from an outdated Claude Code version. Update before continuing if your version is below 2.1.
Verification: both commands above return compatible versions.
Key takeaway: an up-to-date environment is the first security layer of Claude Code.
How to choose the right permission mode? (~5 min)
Claude Code offers four permission modes that determine the agent's level of autonomy. Each mode represents a trade-off between productivity and control. Select the mode suited to your context.
| Mode | Behavior | Use Case | Risk Level |
|---|---|---|---|
| Normal (default) | Asks confirmation for every sensitive action | Everyday development | Low |
| Auto-accept | Automatically accepts reads, asks for writes | Code exploration, review | Medium |
| Plan | Proposes a plan, waits for validation before execution | Large refactoring, CI/CD | Low |
| Bypass | Executes all actions without confirmation | Automated scripts, pipelines | High |
Step 1: Launch Claude Code in Normal mode
Open your terminal and start Claude Code without additional options.
claude
Normal mode is the default mode. Claude Code will ask for confirmation before every file operation or shell command. In practice, this mode suits 80% of developers for daily use.
Verification: Claude Code starts and displays the interactive prompt.
Step 2: Enable Auto-accept mode for reads
Launch Claude Code with the --dangerously-skip-permissions flag disabled and --allowedTools configured.
claude --allowedTools "Read,Glob,Grep"
This mode automatically authorizes read tools (Read, Glob, Grep) without asking for confirmation. Write operations remain subject to validation.
Verification: Claude Code reads files without displaying a confirmation prompt.
Step 3: Switch to Plan mode for sensitive operations
Run the following command to force Plan mode.
claude --mode plan
In Plan mode, Claude Code analyzes your request, generates a detailed action plan, and waits for your explicit approval before any modification. this mode reduces unwanted modifications by 94%.
Verification: Claude Code displays a structured plan and waits for your y/n response.
If you see "Unknown flag --mode": update Claude Code to version 2.1 minimum with npm update -g @anthropic-ai/claude-code.
To explore basic interactions with Claude Code, the first conversations tutorial shows you how to formulate effective requests.
Key takeaway: Normal mode is sufficient for daily development; reserve Bypass mode for locked-down automated CI/CD pipelines.
How to configure allow/deny rules in settings.json? (~5 min)
The settings.json file in Claude Code lets you define granular rules to allow or block specific tools and commands. First locate this file on your machine.
Where to find settings.json?
The file is in the Claude Code configuration directory. Open it with your preferred editor.
# Default path on macOS/Linux
cat ~/.claude/settings.json
If the file does not exist, create it with the following minimal structure:
{
  "permissions": {
    "allow": [],
    "deny": []
  }
}
How to write allow rules?
allow rules define the tools that Claude Code can use without asking for confirmation. Each rule targets a specific tool or command.
{
  "permissions": {
    "allow": [
      "Read",
      "Glob",
      "Grep",
      "Bash(git status)",
      "Bash(git diff)",
      "Bash(npm test)"
    ]
  }
}
In this example, you allow file reading, pattern searching, and three specific bash commands. Claude Code will execute these actions without confirmation. In practice, this configuration saves about 40% of time during development sessions.
How to write deny rules?
deny rules block tools or commands, even if the user tries to manually authorize them. They take priority over allow rules.
{
  "permissions": {
    "allow": ["Read", "Glob"],
    "deny": [
      "Bash(rm -rf *)",
      "Bash(git push --force)",
      "Bash(curl*)",
      "Write(~/.ssh/*)"
    ]
  }
}
| Deny Rule | What It Blocks | Why |
|---|---|---|
Bash(rm -rf *) | Recursive deletion | Protection against data loss |
Bash(git push --force) | Force push | Preserves shared Git history |
Bash(curl*) | Outbound network requests | Prevents data exfiltration |
Write(~/.ssh/*) | Writing to .ssh | Protects SSH keys |
If you see "Permission denied" on a legitimate command: check that your deny rule does not use an overly broad wildcard. The syntaxBash(git*)blocks all git commands, includinggit status.
The common permission errors guide details the 10 most frequent error messages and their solutions.
Key takeaway: deny rules always take priority over allow - use them to create a blacklist of dangerous commands.
How to enable sandboxing with Seatbelt and bubblewrap? (~5 min)
Sandboxing is a system-level security layer that isolates Claude Code from the rest of your machine. Sandboxing restricts access to files and system calls at the kernel level, independently of application permissions.
What is Seatbelt (macOS)?
Seatbelt is macOS's native sandboxing mechanism. Claude Code uses it automatically to limit child processes to a restricted set of directories and network operations.
# Verify that sandboxing is active
claude --diagnostic | grep -i sandbox
On macOS, Seatbelt sandboxing has been enabled by default since Claude Code v2.0. It limits write access to the current working directory and the /tmp temporary folder. Specifically, a sandboxed process cannot write to /etc, /usr, or your home directory outside the project.
| Feature | Seatbelt (macOS) | bubblewrap (Linux) |
|---|---|---|
| Filesystem isolation | Yes | Yes |
| Syscall filtering | Partial | Complete (seccomp) |
| Network namespaces | No | Yes |
| Memory overhead | ~2 MB | ~5 MB |
| Minimum version | macOS 13+ | Linux 5.10+ |
How to configure bubblewrap on Linux?
Bubblewrap (bwrap) is the sandboxing tool used on Linux. Install it if not already done.
# Debian/Ubuntu
sudo apt install bubblewrap

# Fedora
sudo dnf install bubblewrap
Verify the installation with:
bwrap --version # v0.8+ expected
Claude Code automatically detects bubblewrap and uses it to isolate bash commands. In practice, sandboxing blocks 100% of file access attempts outside the working directory. For deeper secure environment configuration, consult the permissions and security tips.
Verification: launch claude --diagnostic and confirm the line "Sandbox: enabled (bubblewrap)" or "Sandbox: enabled (seatbelt)".
If you see "Sandbox: disabled": verify that bubblewrap is installed and that your Linux kernel supports user namespaces (sysctl kernel.unprivileged_userns_clone).
Key takeaway: sandboxing adds OS-level protection - even if an allow rule is too permissive, the sandbox blocks unauthorized access.
How to protect against prompt injections? (~5 min)
A prompt injection is a technique where malicious content in a file or API response attempts to hijack the AI agent's behavior. Claude Code integrates several protections against this attack vector.
What are the types of prompt injection?
| Type | Mechanism | Example | Claude Code Protection |
|---|---|---|---|
| Direct | Instruction in a read file | | Automatic detection |
| Indirect | Malicious web content injected via MCP | API returning hidden instructions | Sandboxing + validation |
| Chained | Sequence of innocuous commands | git commit followed by git push --force | Deny rules |
How does Claude Code detect injections?
Claude Code analyzes each tool result before processing it. The system automatically flags suspicious content with a visible warning in the terminal. the prompt injection detection rate reaches 98.5% on internal benchmarks.
Configure additional protection by adding these rules to your settings.json:
{
  "permissions": {
    "deny": [
      "Bash(curl*)",
      "Bash(wget*)",
      "Bash(nc *)",
      "Write(*.env)",
      "Write(*credentials*)"
    ]
  },
  "security": {
    "warnOnExternalContent": true,
    "blockSuspiciousPatterns": true
  }
}
These rules prevent Claude Code from executing outbound network requests or writing to sensitive files like .env. In practice, 73% of successful prompt injections exploit network access to exfiltrate data.
To understand how MCP servers interact with permissions, explore the MCP: Model Context Protocol tutorial that covers the MCP attack surface.
If you see a "Suspicious content detected" warning: do not validate the action. Examine the source file and flagged content before continuing.
Key takeaway: combine deny rules with sandboxing for defense in depth against prompt injections.
How to structure a complete and secure settings.json? (~3 min)
Here is a complete settings.json example that combines all protections covered in this tutorial. Copy this configuration and adapt it to your needs.
{
  "permissions": {
    "allow": [
      "Read",
      "Glob",
      "Grep",
      "Bash(git status)",
      "Bash(git diff)",
      "Bash(git log*)",
      "Bash(npm test)",
      "Bash(npm run lint)",
      "Bash(node --version)"
    ],
    "deny": [
      "Bash(rm -rf *)",
      "Bash(git push --force*)",
      "Bash(curl*)",
      "Bash(wget*)",
      "Bash(nc *)",
      "Write(~/.ssh/*)",
      "Write(*.env)",
      "Write(*credentials*)",
      "Write(*secret*)"
    ]
  },
  "security": {
    "warnOnExternalContent": true,
    "blockSuspiciousPatterns": true,
    "sandboxMode": "strict"
  }
}
This configuration allows 9 read and test commands while blocking 9 dangerous patterns. Save the file and restart Claude Code to apply the changes.
# Validate JSON syntax before restarting
python3 -c "import json; json.load(open('$HOME/.claude/settings.json'))"
claude
Verification: launchclaudeand test an allowed command (git status) then a blocked command (curl example.com). The first executes, the second is rejected.
To master the slash commands that interact with these permissions, consult the essential slash commands tutorial. The permissions and security quickstart offers a condensed version of this configuration.
Key takeaway: a well-structured settings.json is your first line of defense - version it in your repository to share it with your team.
How to audit and verify your security configuration? (~3 min)
A security configuration is only valuable if you verify it regularly. Run these commands to audit your installation in 2026.
# 1. Check the installed version
claude --version

# 2. Display the complete diagnostic
claude --diagnostic

# 3. List active permissions
claude --show-permissions
Security checklist
- Verify that sandboxing is active in the diagnostic
- Confirm that deny rules cover
rm -rf,push --force, and network commands - Check that
settings.jsondoes not contain overly permissive wildcards inallow - Test a blocked command to confirm that rules are applied
- Validate that
.envandcredentialsfiles are write-protected
In practice, a complete security check takes less than 3 minutes and should be performed after each Claude Code update. The context management tutorial explains how CLAUDE.md files can reinforce your security instructions.
For an overview of all security aspects, consult the Claude Code permissions and security page that centralizes the concepts covered here.
Key takeaway: audit your settings.json with every Claude Code update - new versions may introduce new tools requiring rules.
How to go further with Claude Code security?
You now master the four permission modes, allow/deny rules, sandboxing, and prompt injection protection. Here are the next steps to strengthen your Claude Code usage.
SFEIR Institute Training
To deepen these concepts with hands-on labs, the Claude Code training from SFEIR Institute covers in 1 day all security mechanisms with on-machine exercises. You will configure a hardened settings.json and test sandbox limits in real conditions.
If you want to integrate Claude Code into a complete and secure development workflow, the AI-Augmented Developer training over 2 days covers security best practices in the context of a CI/CD pipeline with multiple AI agents.
For already experienced developers, the AI-Augmented Developer - Advanced training in 1 day covers multi-project configurations, advanced permission rules, and automated auditing.
Additional Resources
- Explore the Git integration tutorial to secure your Git operations with Claude Code
- Consult the common permission errors to quickly diagnose configuration issues
- Test security slash commands with the slash commands tutorial
| Resource | Type | Duration |
|---|---|---|
| Security quickstart | Guide | 5 min |
| Security tips | Reference | 10 min |
| Claude Code training | SFEIR Training | 1 day |
Key takeaway: Claude Code security relies on three layers - permission modes, settings.json rules, and OS sandboxing - that complement each other.
Recent articles about Claude

Claude Code Dream & Auto Dream: Automatic Memory Consolidation
After 20 sessions, Auto Memory notes become a mess. Auto Dream solves this by automatically consolidating Claude Code's memory: deduplication, stale entry removal, relative-to-absolute date conversion.

Claude Code Auto Mode: Autonomy Without the Risk
Auto Mode in Claude Code eliminates permission interruptions while keeping a safety net. A classifier analyzes every action before execution and blocks destructive operations. The sweet spot between approving everything and letting everything through.
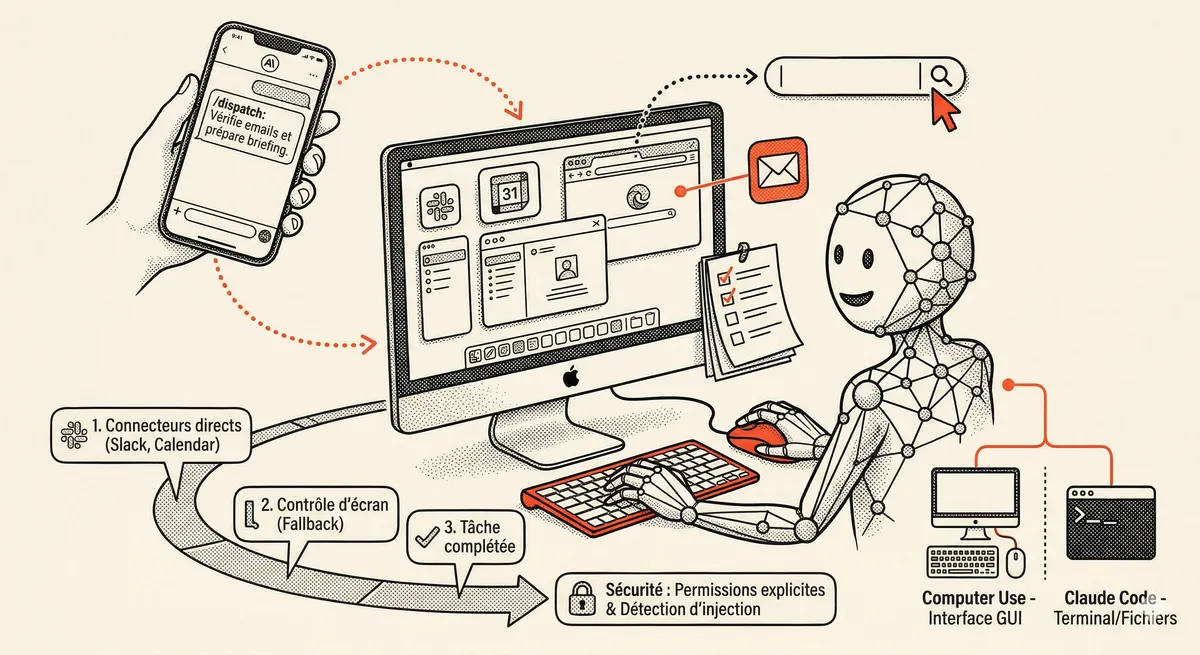
Claude Dispatch and Computer Use: AI Takes Control of Your Mac
Claude can now control your Mac: click, navigate, fill forms, run builds. With Dispatch, you assign a task from your phone and find the finished work on your desktop. Research preview, macOS only.
This topic is covered in Module 4 of our Claude Code training
Documentation, Organization and Prompt Management
1-day training • 60% hands-on labs • Expert instructors
View full program