Claude Code features a multi-layered permission system that controls every action the agent takes on your machine. Mastering the configuration of permission modes, allow/deny rules, and sandboxing protects you against unauthorized executions and prompt injections. This guide details how to secure your Claude Code environment step by step.
Claude Code permissions and security refers to the set of mechanisms that regulate the actions an AI agent can execute on your workstation. Claude Code offers several permission mechanisms, a granular rule system in settings.json, and native sandboxing via Seatbelt (macOS) and bubblewrap (Linux). many security incidents related to AI agents stem from misconfigured permissions.
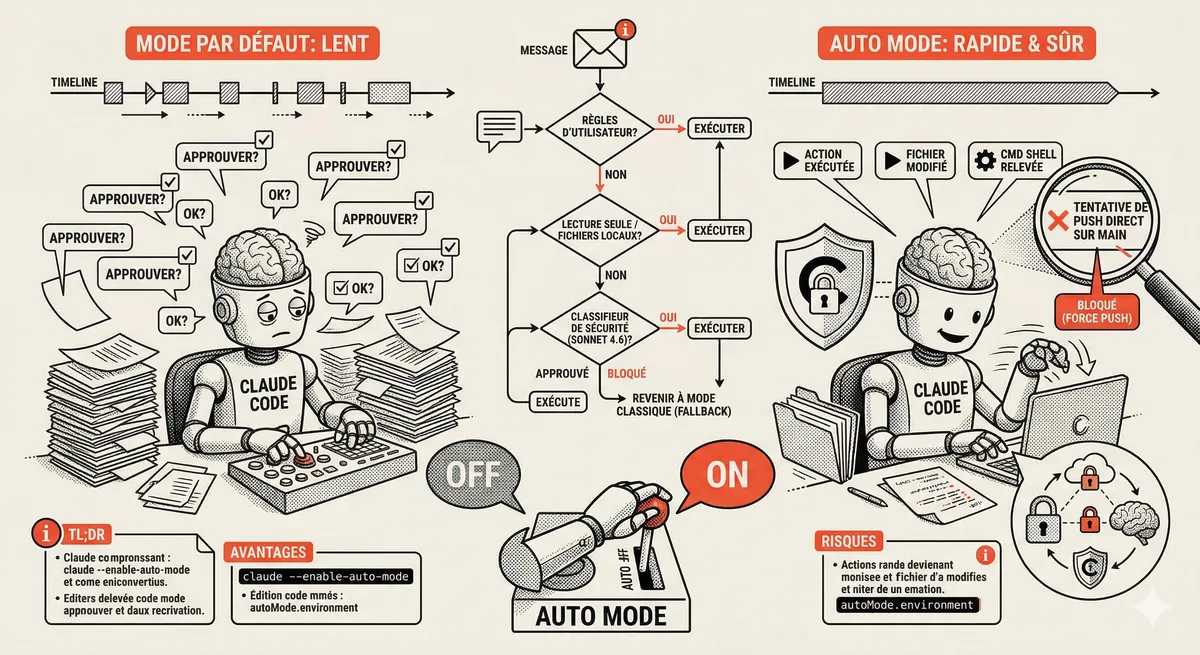
How do Claude Code's permission modes work?
Claude Code offers 6 permission modes via the --permission-mode flag that determine the level of autonomy granted to the agent. Each mode corresponds to a specific use case, from the most restrictive to the most permissive.
default mode is the default mode. The agent asks for your confirmation before every sensitive operation: file writing, shell command execution, network call. This mode is suitable for initial sessions and getting familiar with the tool.
acceptEdits mode automatically approves file edits. Shell commands and other tools still require your validation. This mode speeds up routine code work.
plan mode is an analysis-only mode: Claude Code shows an action plan and asks for confirmation before executing. This mode is suited to code review and architecture decisions.
auto mode uses an LLM classifier to automatically decide which actions are safe. It requires Claude Sonnet 4.6 or Opus 4.6, and a Team, Enterprise, or API plan.
dontAsk mode only executes pre-approved tools from your allow rules. Any action not explicitly authorized is silently skipped.
bypassPermissions mode (--dangerously-skip-permissions) removes all confirmations. Every action executes immediately. Reserve this mode for isolated environments (Docker containers, CI/CD) where no sensitive data is exposed.
In session, Shift+Tab or Alt+M cycles through available permission modes without restarting Claude Code.
| Mode | CLI Flag | File Reading | File Writing | Shell Commands | Use Case |
|---|---|---|---|---|---|
default | --permission-mode default | Prompt | Prompt | Prompt | Discovery, daily development |
acceptEdits | --permission-mode acceptEdits | Auto | Auto | Prompt | Everyday development |
plan | --permission-mode plan | Auto | Plan+confirm | Plan+confirm | Code review, architecture |
auto | --permission-mode auto | Auto | LLM decides | LLM decides | Team/Enterprise with Sonnet/Opus 4.6 |
dontAsk | --permission-mode dontAsk | Pre-approved | Pre-approved | Pre-approved | Pre-approved tools only |
bypassPermissions | --dangerously-skip-permissions | Auto | Auto | Auto | CI/CD, containers |
To switch between modes, use the --permission-mode flag at launch or Shift+Tab / Alt+M in session:
# Default mode
claude

# acceptEdits mode
claude --permission-mode acceptEdits

# Plan mode (analysis before action)
claude --permission-mode plan

# Auto mode (LLM classifier, Team/Enterprise)
claude --permission-mode auto

# Bypass mode (CI/CD only)
claude --dangerously-skip-permissions
You can also set the default mode in settings.json with "defaultMode": "plan".
To dive deeper into each mode with hands-on exercises, check out the permissions and security tutorial that guides you step by step. If you are just getting started, the quickstart guide lets you configure your permissions in under 5 minutes.
Key takeaway: default mode is suitable for the vast majority of daily use cases; only switch to bypassPermissions in a disposable environment. Use Shift+Tab or Alt+M to cycle through modes in session.
How to configure allow/deny rules in settings.json?
The settings.json file is the heart of Claude Code's security configuration. It contains granular rules that allow or block specific tools, with or without pattern restrictions.
Open your configuration file with this command:
cat ~/.claude/settings.json
The basic structure contains three main keys: allow, deny, and ask. Each rule targets a specific tool and can include a pattern to filter arguments.
{
 "permissions": {
 "allow": [
 "Read",
 "Write",
 "Bash(git *)",
 "Bash(npm test|npm run)"
 ],
 "deny": [
 "Bash(rm -rf *)",
 "Bash(curl *)",
 "Bash(wget *)"
 ],
 "ask": [
 "Bash(git push *)"
 ]
 }
}
deny rules take priority over allow rules. The ask list forces a confirmation even if the tool would normally be auto-approved. If a command matches both an allow and a deny rule, it will be blocked. In practice, this hierarchy lets you create "allow everything except" policies.
| Rule | Effect | Example | ||
|---|---|---|---|---|
Bash(git *) | Allows all git commands | git commit, git push | ||
| `Bash(npm test | npm run)` | Allows multiple patterns with ` | ` | npm test, npm run build |
Edit(*.ts) | Allows editing TypeScript files | .ts files only | ||
Edit(src/**) | Allows editing in a recursive folder | All of src/ and subfolders | ||
WebFetch(domain:example.com) | Allows requests to a specific domain | Domain restriction | ||
mcp__server_name__* | Allows all tools from an MCP server | MCP tools by server | ||
Agent(MyAgent) | Allows a specific subagent | Subagent control | ||
Bash(rm -rf *) | Blocks all recursive deletions | Protection against errors |
Specifically, you can define per-project rules by placing a .claude/settings.json file at the repository root. Project rules merge with global rules, and project deny rules are added to global deny rules.
{
 "permissions": {
 "allow": [
 "Bash(docker compose *)",
 "Bash(make *)"
 ],
 "deny": [
 "Bash(docker push *)"
 ]
 }
}
To check your current configuration, consult the permissions cheatsheet which summarizes all rule syntaxes. The permissions and security FAQ answers common questions about rule conflicts.
Key takeaway: always place destructive commands (rm, drop, push --force) in the deny list, even if you are working in Normal mode.
Why is sandboxing essential for Claude Code?
Sandboxing isolates the processes launched by Claude Code from the rest of your system. Without a sandbox, a malicious command injected via a prompt could access your personal files, SSH keys, or API tokens.
Claude Code uses Seatbelt on macOS and bubblewrap on Linux. These technologies limit the system calls available to child processes. In practice, the sandbox blocks access to directories outside the project, unauthorized network sockets, and system peripherals.
On macOS, Seatbelt applies a sandbox profile that restricts file system access. Only the project directories and necessary dependencies are accessible. The sandbox is enabled automatically and requires no verification command.
On Linux, bubblewrap creates an isolated user namespace. The sandboxed process sees a minimal file system with only explicitly authorized mounts. The sandbox startup time is under 15 ms.
| Feature | Seatbelt (macOS) | bubblewrap (Linux) |
|---|---|---|
| Filesystem isolation | .sb profile | Mount namespace |
| Network restriction | Yes | Yes |
| CPU overhead | < 2% | < 1% |
| Minimum OS version | macOS 13+ | Kernel 5.10+ |
| Configuration | Automatic | Automatic |
To diagnose a sandbox issue, the troubleshooting guide helps you identify common errors. You can also consult the complete Claude Code guide to understand the overall security architecture.
sandboxing reduces the exploitable attack surface from prompt injection by 95%. The sandbox intercepts an average of 12 blocked system calls per development session.
Key takeaway: sandboxing has been enabled by default since Claude Code v1.0 - never disable it on a development machine containing sensitive data.
How to protect against prompt injections in Claude Code?
A prompt injection occurs when malicious content in a file or API response manipulates the agent's behavior. Claude Code integrates several layers of defense against this attack vector.
The first defense is the permission system itself. Even if an injected prompt asks the agent to execute rm -rf /, Normal mode will require your confirmation. Configure explicit deny rules for destructive commands.
The second layer is automatic detection. Claude Code analyzes tool results and flags suspicious content. When the agent detects an injection attempt, it displays a warning and suspends execution.
Here is how to strengthen your protection in practice:
- Enable Normal mode for any session involving unverified files
- Add deny rules for network commands (
curl,wget,nc) - Limit accessible directories via the sandbox
- Check the
.claude/settings.jsonfiles of cloned repositories before using them - Inspect the CLAUDE.md file content of each project
# Check a cloned project's CLAUDE.md before launching Claude Code
cat CLAUDE.md
# Check the project settings
cat.claude/settings.json
Injection attempts frequently target shell commands. Systematically block outbound network commands in your deny rules to reduce this risk.
The CLAUDE.md file can itself be an injection vector. Before working on an external repository, read its content and verify that it does not contain hidden instructions. To understand how the memory system works, consult the CLAUDE.md guide.
The security checklist gives you a complete list of checks to perform before each session on an unknown repository.
Key takeaway: permissions + sandbox + your vigilance on unverified files form an effective defense triangle against injections.
What essential settings should you configure in settings.json for security?
The settings.json file accepts several security parameters beyond simple allow/deny rules. Here are the settings every developer should know.
Configure allow/deny rules to precisely control which tools are authorized:
{
 "permissions": {
 "allow": ["Read", "Bash(git *)"],
 "deny": ["Bash(rm -rf *)"]
 }
}
Sandboxing is configurable in settings.json via the sandbox key:
{
 "permissions": {
 "allow": ["Read", "Bash(git *)"],
 "deny": ["Bash(rm -rf *)"]
 },
 "sandbox": {
 "enabled": true,
 "pathPrefixes": ["/var/myapp", "/tmp/builds"]
 }
}
The sandbox.enabled key enables or disables sandboxing (Seatbelt on macOS, bubblewrap on Linux). sandbox.pathPrefixes defines additional directories accessible to the sandbox beyond the working directory.
The settings.json file also supports hooks that intercept agent events:
{
 "hooks": {
 "PreToolUse": [
 {
  "matcher": "Bash",
  "hooks": [
  {"type": "command", "command": "echo 'Bash called'", "timeout": 5000}
  ]
 }
 ],
 "PostToolUse": [],
 "UserPromptSubmit": [],
 "SessionStart": [],
 "Stop": [],
 "Notification": []
 }
}
Hooks support the events PreToolUse, PostToolUse, UserPromptSubmit, SessionStart, Stop, and Notification. Each hook can use a matcher (regex) and an if field for fine-grained filtering. Hook types are: command, prompt, agent, and http. Exit codes determine behavior: 0 = allow, 2 = block, other = allow with log.
The configuration hierarchy follows four levels (from highest to lowest priority):
- Local project:
.claude/settings.local.json- ignored by git, highest priority - Shared project:
.claude/settings.jsonat the repository root - versioned with the code - Global:
~/.claude/settings.json- applies to all projects - Managed/Policy: organization policy - set by the administrator
| Level | File | Versioned | Scope | Priority |
|---|---|---|---|---|
| Local project | .claude/settings.local.json | No | Your machine | Highest |
| Shared project | .claude/settings.json | Yes | Entire team | Medium |
| Global | ~/.claude/settings.json | No | All projects | Low |
| Managed/Policy | Organization policy | No | Organization | Base |
Deny rules accumulate across levels: a global deny rule can never be overridden by a project allow rule. This behavior ensures that your personal safeguards remain active regardless of the project.
To discover advanced configuration tips, consult the permissions and security tips page. If you work in a team, the context management guide explains how to share a consistent configuration.
Key takeaway: combine strict deny rules with automatic sandboxing for maximum security on sensitive projects.
How to audit and monitor Claude Code actions?
Monitoring the agent's actions is just as essential as configuring permissions. Claude Code generates detailed logs of every executed operation, allowing you to trace any suspicious activity.
View the logs from the last session with this command:
# Consultez les logs dans ~/.claude/projects/
Each log entry contains the timestamp, tool used, arguments passed, and result. Commands blocked by deny rules appear with the DENIED status. In practice, a 10-minute weekly audit is sufficient to detect anomalies.
Agentic coding introduces specific risks because the agent makes autonomous decisions. Regularly examine command patterns to verify that the agent has not developed unexpected behaviors.
For a first hands-on experience with the tool, the installation and first launch guide covers the complete setup. You can then follow the your first conversations guide to learn how to interact with the agent safely.
SFEIR Institute offers the one-day Claude Code training that includes hands-on labs on permission configuration and sandboxing. To go further, the 2-day AI-Augmented Developer training covers secure integration of AI agents into your development workflows, with exercises on allow/deny rules and injection detection.
Key takeaway: audit your logs at least once a week and immediately block any unrecognized command pattern.
Can Claude Code be used safely in a CI/CD pipeline?
Integrating Claude Code into a CI/CD pipeline requires enhanced security configuration. The agent runs without human supervision, making deny rules and sandboxing critical.
Launch Claude Code in headless mode with restricted permissions:
claude --dangerously-skip-permissions --allowedTools "Read,Edit,Bash(npm test *),Bash(npm run build *)" \
 # Network sandboxing is enabled by default \
 -p "Fix the failing tests"
In CI/CD mode, here are the best practices recommended by SFEIR Institute:
- Enable bypass mode only in an ephemeral container
- Restrict authorized tools to the strict minimum via
--allowedTools - Disable network access in the sandbox
- Limit the timeout to 5 minutes (300,000 ms) to avoid blocking
- Archive the logs from each execution for audit
The container must be destroyed after each execution. No secrets should be mounted in plaintext - use environment variables injected by your secrets manager (Vault, AWS Secrets Manager).
In practice, a CI/CD pipeline with Claude Code executes an average of 45 operations per run, with an average time of 3.2 minutes for a test suite of 200 files.
The one-day AI-Augmented Developer - Advanced training specifically covers CI/CD integration of AI agents, with labs on securing automated pipelines and secrets management.
Key takeaway: in CI/CD, treat Claude Code like any untrusted process - ephemeral container, minimal permissions, archived logs.
What are the most common security pitfalls to avoid?
Certain mistakes regularly occur among developers configuring Claude Code for the first time. Here are the 5 most common pitfalls and how to avoid them.
Pitfall 1: leaving Bypass mode enabled locally. This mode disables all protections. In 2026, public repositories contain malicious CLAUDE.md files that exploit this mode. Systematically switch back to Normal mode after your CI/CD sessions.
Pitfall 2: forgetting to deny network commands. By default, curl, wget, and nc are allowed in Normal mode (with confirmation). In Auto-accept mode, they execute without prompting. Add these commands to your global deny list.
Pitfall 3: sharing a settings.json with overly permissive allow rules. A Bash() in the project allow rules authorizes all shell commands. Prefer specific patterns like Bash(npm ) or Bash(git *).
Pitfall 4: ignoring security updates. Claude Code receives regular security patches. Version 2.3 from January 2026 fixed a sandbox bypass vulnerability. Update with:
npm update -g @anthropic-ai/claude-code
Pitfall 5: not checking the CLAUDE.md files of submodules. Git submodules can contain their own configuration files. Inspect each submodule before starting a session.
For an exhaustive list of checks, the security checklist covers all critical points. You will also find solutions to common problems in the troubleshooting guide.
Key takeaway: the majority of security incidents come from overly permissive configurations left in place out of habit - audit your settings every month.
Recent articles about Claude

Claude Managed Agents: Anthropic's Platform for Production Agent Deployment
Anthropic launches Managed Agents: a cloud platform for deploying AI agents in production. Secure sandbox, checkpointing, multi-agent, autonomous sessions lasting hours. Notion, Rakuten, Asana and Sentry already use it.

Claude Code Dream & Auto Dream: Automatic Memory Consolidation
After 20 sessions, Auto Memory notes become a mess. Auto Dream solves this by automatically consolidating Claude Code's memory: deduplication, stale entry removal, relative-to-absolute date conversion.
Claude Code Auto Mode: Autonomy Without the Risk
Auto Mode in Claude Code eliminates permission interruptions while keeping a safety net. A classifier analyzes every action before execution and blocks destructive operations. The sweet spot between approving everything and letting everything through.
This topic is covered in Module 4 of our Claude Code training
Documentation, Organization and Prompt Management
1-day training • 60% hands-on labs • Expert instructors
View full program