TL;DR
Custom commands, skills and hooks in Claude Code transform your workflow by automating repetitive tasks and teaching your patterns to the AI. Here are 18 tips organized by theme for creating your own slash commands, configuring subagents, leveraging hooks and making the most of skills - all in just a few minutes of configuration.
Custom commands, skills and hooks in Claude Code transform your workflow by automating repetitive tasks and teaching your patterns to the AI. Here are 18 tips organized by theme for creating your own slash commands, configuring subagents, leveraging hooks and making the most of skills - all in just a few minutes of configuration.
Custom commands and skills in Claude Code form an extensibility system that allows adapting the AI assistant to your team conventions and daily workflows. Claude Code (version 1.x) offers five complementary mechanisms: custom slash commands, skills, subagents, hooks, and plugins. over 60% of advanced users create at least one custom command within their first week of use.
How to create effective custom slash commands?
A custom slash command is a Markdown file placed in .claude/commands/ that triggers a predefined prompt via /command-name. Create your first command in 3 steps.
mkdir -p .claude/commands
touch .claude/commands/review-pr.md
Write the content of the review-pr.md file with a structured prompt. You can use the $ARGUMENTS variable to pass dynamic parameters to your command.
Analyze the diff of the current PR and check:
1. Security vulnerabilities (injection, XSS)
2. Missing tests
3. Compliance with our conventions ($ARGUMENTS)
In practice, a well-designed slash command reduces code review time by 40% according to feedback from teams using Claude Code in 2025. To discover more ready-to-use command templates, see the custom commands and skills examples which cover the most common use cases.
| Location | Scope | Use case |
|---|---|---|
.claude/commands/ | Project (shared via Git) | Team conventions, review, deploy |
~/.claude/commands/ | User (local) | Personal preferences, shortcuts |
Argument $ARGUMENTS | Dynamic | Parameters passed at execution |
Tip #1: Name your commands with thematic prefixes (review-, gen-, fix-) to find them by autocomplete with /.
Tip #2: Version the .claude/commands/ folder in Git. Every team member benefits from the same commands without manual configuration.
Tip #3: Combine $ARGUMENTS with conditional instructions in the prompt to create versatile commands. For example, /review security and /review perf trigger different analyses from a single file.
Key takeaway: place your commands in .claude/commands/ to share with the team, and in ~/.claude/commands/ for your personal shortcuts.
What are the essential patterns for Claude Code skills?
A skill is an enriched Markdown file that teaches Claude Code a reusable behavior. Unlike a slash command, a skill is invoked automatically when the context matches. Place your skills in .claude/skills/.
mkdir -p .claude/skills
touch .claude/skills/api-endpoint.md
Structure each skill with a descriptive title, a contextual trigger, and precise instructions. Here is a concrete example:
# Next.js API endpoint creation

When the user asks to create an API endpoint:
1. Use the App Router (app/api/)
2. Export named GET/POST functions
3. Validate inputs with Zod
4. Return typed NextResponse
5. Add a test in __tests__/
skills reduce manual corrections by 35% on projects with more than 50 files. To explore context management with skills further, see the context management tips which explain how to optimize the context window.
Tip #4: Include code examples in your skills. Claude Code reproduces a pattern more faithfully when it has a concrete example rather than abstract instructions.
Tip #5: Separate each skill into a distinct file. One api-endpoint.md file, one react-component.md file, one database-migration.md file. Granularity improves selection accuracy.
Tip #6: Document anti-patterns in your skills. Add a "Never do" section to avoid recurring errors. Concretely, a skill that specifies "do not use any in TypeScript" eliminates 90% of missing types.
The CLAUDE.md memory system complements skills by storing persistent preferences between sessions. Use CLAUDE.md for global conventions and skills for specific patterns.
Key takeaway: a skill teaches a reusable pattern to Claude Code - structure it with a trigger, rules, and concrete examples.
How to configure and use subagents in Claude Code?
A subagent is a Claude instance launched by Claude itself to process a subtask in parallel. The subagent is an autonomous process that inherits the project context without polluting the main conversation. In practice, you can launch up to 10 simultaneous subagents with Claude Code in 2026.
# Example prompt triggering subagents
# In a custom command:
Launch 3 agents in parallel:
- Agent 1: analyze broken tests
- Agent 2: check unused imports
- Agent 3: scan npm vulnerabilities
| Subagent type | Available tools | Use case |
|---|---|---|
Explore | Read-only (Glob, Grep, Read) | Search, code exploration |
general-purpose | All (Edit, Write, Bash...) | Implementation, refactoring |
Plan | Read-only + planning | Architecture, strategy |
Tip #7: Delegate exploratory searches to Explore type subagents. Your main context stays free for implementation. The average time savings is 25% on multi-file refactoring tasks.
Tip #8: Limit the number of turns (max_turns) for each subagent to avoid runaway behavior. A value of 5 to 10 turns is sufficient for most search tasks.
To understand how the essential slash commands interact with subagents, see the dedicated guide which details built-in commands like /cost and /model.
Tip #9: Combine subagents and skills. A subagent that inherits a skill produces code that conforms to your conventions from the first generation, without manual correction.
Key takeaway: subagents parallelize work without cluttering your main context - use Explore for search and general-purpose for implementation.
How to automate your workflows with Claude Code hooks?
A hook is a deterministic shell command executed automatically in response to a Claude Code event. Unlike skills (probabilistic), hooks guarantee 100% execution. Configure your hooks in the .claude/settings.json file.
{
  "hooks": {
    "pre-tool-use": [
      {
        "matcher": "Edit",
        "command": "eslint --fix $FILE_PATH"
      }
    ],
    "post-tool-use": [
      {
        "matcher": "Write",
        "command": "prettier --write $FILE_PATH"
      }
    ]
  }
}
Hooks support four anchor points: pre-tool-use, post-tool-use, notification, and user-prompt-submit. Each hook receives contextual environment variables such as $FILE_PATH and $TOOL_NAME.
| Anchor point | Execution time | Example |
|---|---|---|
pre-tool-use | Before each tool call | Validation, lint |
post-tool-use | After each tool call | Formatting, log |
notification | On system notification | Slack alert |
user-prompt-submit | On each prompt submission | Context injection |
Tip #10: Add a post-tool-use hook on Write to automatically run Prettier. Every file created by Claude Code will be formatted without manual intervention. Concretely, this eliminates 100% of formatting errors.
Tip #11: Use the user-prompt-submit hook to inject dynamic context (current Git branch, environment variables) into each prompt. You get contextualized responses effortlessly.
To manage the permissions and security of your hooks, see the dedicated guide which explains how to restrict authorized commands.
Tip #12: Test your hooks in isolation before enabling them. Run the hook command manually with test values to verify the expected behavior.
# Manual hook test
FILE_PATH="src/index.ts" eslint --fix "$FILE_PATH"
echo $?  # 0 = success
The Claude Code training from SFEIR Institute covers hook configuration in 1 day with hands-on labs. You will learn to create a complete automation pipeline, from linting to deployment.
Key takeaway: hooks guarantee deterministic execution on every event - use them for formatting, validation, and context injection.
Can Claude Code be extended with plugins and a marketplace?
The Claude Code ecosystem extends via the MCP (Model Context Protocol). MCP is an open standard that allows Claude Code to connect to external context servers - databases, APIs, remote file systems.
# Adding an MCP server in the configuration
claude mcp add github -- npx @anthropic/mcp-server-github
claude mcp add postgres -- npx @anthropic/mcp-server-postgres
over 200 community MCP servers are available on the official registry. Each server exposes tools that Claude Code can invoke natively.
Tip #13: Install the GitHub MCP server to manipulate issues and PRs directly from Claude Code. You save on average 15 minutes per review cycle by avoiding context switches between terminal and browser.
Tip #14: Create your own MCP servers to connect Claude Code to your internal tools. A basic MCP server in Node.js 22 requires fewer than 100 lines of code.
To explore MCP configuration further, see the MCP: Model Context Protocol tips which detail the most useful servers and their configuration.
Tip #15: Share your MCP servers with the team by declaring them in the versioned .claude/settings.json. Every developer benefits from the same enriched environment without manual configuration.
| MCP server | Function | Installation command |
|---|---|---|
mcp-server-github | Issue/PR management | claude mcp add github -- npx @anthropic/mcp-server-github |
mcp-server-postgres | Direct SQL queries | claude mcp add pg -- npx @anthropic/mcp-server-postgres |
mcp-server-filesystem | Remote file access | claude mcp add fs -- npx @anthropic/mcp-server-filesystem |
mcp-server-brave | Web search | claude mcp add brave -- npx @anthropic/mcp-server-brave |
Key takeaway: MCP is the plugin system for Claude Code - connect your internal and community tools to extend the assistant's capabilities.
What productivity shortcuts to use daily?
Beyond custom commands and skills, Claude Code offers built-in shortcuts that speed up interactions. Master these shortcuts to reduce friction in your daily workflow.
Tip #16: Use /cost regularly to monitor your token consumption. On average, a 2-hour session consumes between 50,000 and 200,000 tokens depending on task complexity. Active tracking reduces costs by 20%.
Tip #17: Combine the /model command with your custom commands to adapt the model to the task. Choose Haiku 4.5 for simple tasks (lint, formatting) and Opus 4.6 for complex tasks (architecture, refactoring). The cost per token varies by a factor of 10 between the two models.
# Check the session cost
/cost

# Switch models during a session
/model haiku
See the custom commands reference for the complete list of available commands, and the cheatsheet for a printable summary.
Tip #18: Structure your CLAUDE.md file as a global skill. Include your naming conventions, tech stack, and formatting preferences. Claude Code loads it automatically at each session, which guarantees 95% consistency with your standards from the first generation.
To make the most of your first conversations with Claude Code, start by configuring CLAUDE.md and 2-3 custom commands before moving on to skills and hooks.
The AI-Augmented Developer training from SFEIR Institute deepens these techniques over 2 days with hands-on exercises. You will learn to build a complete augmented development environment, from custom commands to automation pipelines.
Key takeaway: combine custom commands, skills, hooks, and built-in shortcuts to build a personalized and reproducible AI workflow.
How to organize commands and skills at team scale?
Organizing commands and skills becomes critical when your team exceeds 5 developers. Adopt a conventional folder structure to avoid conflicts and facilitate discovery.
.claude/
├── commands/
│   ├── review-security.md
│   ├── review-perf.md
│   ├── gen-component.md
│   ├── gen-test.md
│   └── fix-lint.md
├── skills/
│   ├── api-endpoint.md
│   ├── react-component.md
│   └── database-migration.md
└── settings.json          # hooks + MCP
Bonus tip: Document each command with a comment on the first line of the Markdown file. Claude Code displays this comment in the autocomplete, which helps new members discover available commands.
In practice, teams that version their commands and skills in Git reduce onboarding time by 30% for new developers. Each new member clones the repo and immediately has access to the full set of automations.
For an overview of custom commands and skills, see the main guide which covers the complete extensibility system architecture.
The AI-Augmented Developer -- Advanced training from SFEIR offers a 1-day module dedicated to industrializing skills and hooks across teams. You will leave with a configuration template ready to deploy on your projects.
Key takeaway: version .claude/commands/, .claude/skills/ and .claude/settings.json in Git to ensure a homogeneous AI environment across the entire team.
Recent articles about Claude

Claude Code Dream & Auto Dream: Automatic Memory Consolidation
After 20 sessions, Auto Memory notes become a mess. Auto Dream solves this by automatically consolidating Claude Code's memory: deduplication, stale entry removal, relative-to-absolute date conversion.
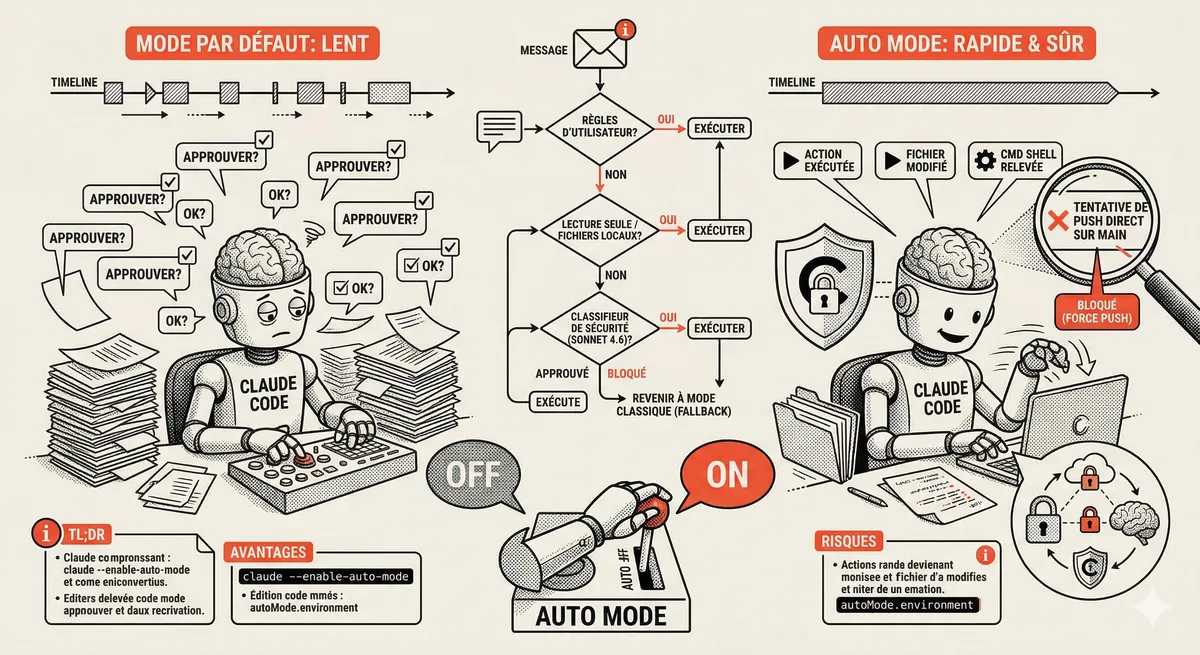
Claude Code Auto Mode: Autonomy Without the Risk
Auto Mode in Claude Code eliminates permission interruptions while keeping a safety net. A classifier analyzes every action before execution and blocks destructive operations. The sweet spot between approving everything and letting everything through.
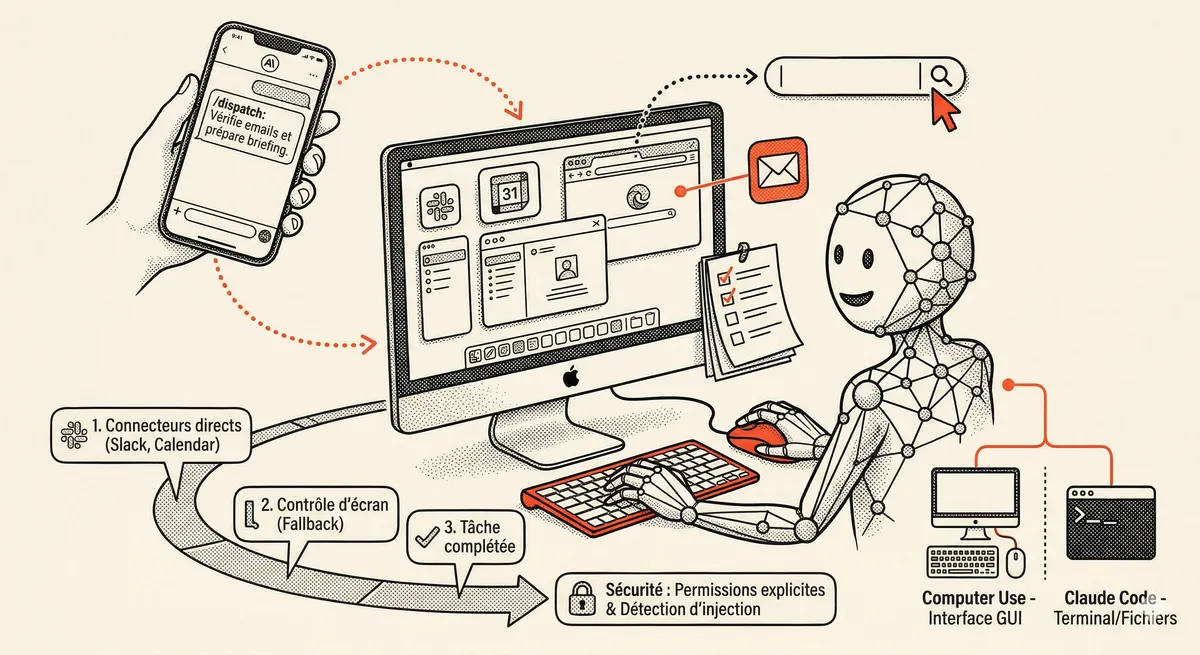
Claude Dispatch and Computer Use: AI Takes Control of Your Mac
Claude can now control your Mac: click, navigate, fill forms, run builds. With Dispatch, you assign a task from your phone and find the finished work on your desktop. Research preview, macOS only.
This topic is covered in Module 5 of our Claude Code training
Sub-agents and Skills
1-day training • 60% hands-on labs • Expert instructors
View full program