TL;DR
Creating your own slash commands, configuring skills and hooking into Claude Code lets you automate many repetitive development tasks. This guide covers setting up custom commands, having the AI automatically learn your conventions, orchestrating parallel subagents, and integrating MCP plugins.
Creating your own slash commands, configuring skills and hooking into Claude Code lets you automate many repetitive development tasks. This guide covers setting up custom commands, having the AI automatically learn your conventions, orchestrating parallel subagents, and integrating MCP plugins.
Custom commands and skills in Claude Code form the extensibility system that adapts the AI agent to your specific development practices. Custom commands have now been merged into skills: both a .claude/commands/ file and a .claude/skills/ file produce the same / slash command. Alongside these, Claude Code offers automation hooks and parallel subagents. Creating a custom command is one of the first things many teams set up.
SFEIR Institute trainings
Claude Code Training
1 day · Fundamentals
AI-Augmented Developer
2 days · Intermediate
How do custom commands work in Claude Code?
A custom command is a Markdown file stored in .claude/commands/ that defines a reusable prompt invocable via /command-name. Create a file, write your prompt, and Claude Code automatically detects it at startup.
The mechanism relies on naming conventions. Each .md file in the .claude/commands/ directory becomes a slash command. You can organize your commands into subfolders to categorize them by domain.
To understand the overall architecture of the tool, check the introduction page to Claude Code which presents all available features.
| Element | Location | Scope |
|---|---|---|
| Project commands | .claude/commands/ | Shared via Git with the team |
| Personal commands | ~/.claude/commands/ | Local to your machine |
| CLAUDE.md | Project root | Instructions loaded automatically |
In practice, project commands are versioned with your code and shared with the entire team. Personal commands remain private on your machine. This separation lets you standardize team practices while keeping your individual shortcuts.
The $ARGUMENTS variable is the mechanism for injecting dynamic parameters into your slash commands. It captures all text entered after the command name.
Key takeaway: custom commands are Markdown files in .claude/commands/: one file = one reusable slash command for the entire team.
How to create a custom slash command step by step?
Open your terminal and create the commands directory if needed:
mkdir -p .claude/commands
Create a file for your first command. Here is how to define a /review command that performs a code review:
Analyze the current Git diff and perform a code review.
Check for:
- Logic errors
- Security vulnerabilities (injection, XSS)
- Project convention violations
- Missing tests
Format your response with concrete suggestions.
Save this content to .claude/commands/review.md, then test it directly:
claude
> /review
Claude Code detects the file and executes the associated prompt. Custom commands load quickly at startup. You can also create parameterized commands.
Check the step-by-step custom commands tutorial for examples including variables and advanced parameters.
Generate unit tests for the file $ARGUMENTS.
Use the test framework already configured in the project.
Cover nominal cases, edge cases, and errors.
Save this file as .claude/commands/gen-test.md and run it with an argument:
> /gen-test src/utils/parser.ts
Commands with arguments cover a wide range of enterprise use cases. The system supports commands nested in subfolders, accessible via /folder/command.
To quickly find the syntax, keep the command reference at hand, which lists all available parameters.
Key takeaway: create a .md file in .claude/commands/, use $ARGUMENTS for dynamic parameters, and your command is operational.
What are skills and how does the AI learn your patterns?
Declarative skills live in .claude/skills/ (project) or ~/.claude/skills/ (user). They are Markdown files (SKILL.md) with a YAML frontmatter that defines their behavior: name, description, when_to_use, argument-hint, disable-model-invocation (default false), user-invocable (default true), allowed-tools, and disallowed-tools. Set disable-model-invocation: true for manual-only skills and user-invocable: false to hide a skill from the / menu. The scope is determined by where the SKILL.md lives: ~/.claude/skills/ for user skills, .claude/skills/ for project skills. Claude Code discovers them automatically and recursively. The /skills command lists all available skills.
Declarative skills support content substitutions such as $ARGUMENTS (user input), $ARGUMENTS[N] and $N (positional arguments), and $name (named arguments), along with the variables ${CLAUDE_SESSION_ID}, ${CLAUDE_EFFORT}, and ${CLAUDE_SKILL_DIR} (the skill's own directory, used to reference bundled files).
Beyond skills, your development conventions are also taught through the CLAUDE.md file at the project root (or in subdirectories). CLAUDE.md is the project memory and instructions system, not a skill: it is read automatically and influences every response from the agent.
Define your naming conventions, architectural patterns, and style rules in the CLAUDE.md file.
## Project React conventions
- Functional components with hooks only
- Files named in PascalCase: UserProfile.tsx
- Types in an adjacent.types.ts file
- Zustand for global state management
- Tests with Vitest + Testing Library
- Minimum coverage: 80%
In practice, a well-written skill noticeably reduces the manual corrections you need to make. Claude Code loads all project skills at the start of each session.
| Skill type | Example | Typical impact |
|---|---|---|
| Code conventions | Naming, formatting, patterns | More consistent code |
| Architecture | Folder structure, layers | Less refactoring needed |
| Tests | Frameworks, minimum coverage | Better test coverage |
| Security | OWASP rules, validation | More vulnerabilities caught early |
You can check the commands and skills cheatsheet to quickly find the syntax for each type of skill.
The CLAUDE.md file is the project memory, read as a priority by Claude Code. Add your high-level instructions there. You can also place CLAUDE.md files in subdirectories for specialized instructions by domain.
To understand how skills integrate into the agentic coding paradigm, see our dedicated guide that explains the role of agent autonomy.
Key takeaway: skills teach your conventions to the AI persistently. They apply automatically to every interaction without manual invocation.
How to use subagents to parallelize your tasks?
A subagent is a secondary Claude instance launched by the main agent to process a subtask in parallel. This mechanism allows breaking down complex work into independent units executed simultaneously.
Concretely, when you ask Claude Code to refactor 5 files, the main agent can delegate each file to a dedicated subagent. Running them in parallel completes the work much faster than processing each file one after another.
Claude Code can run several subagents in parallel, and the main agent orchestrates them automatically. Running subagents in parallel consumes more tokens than processing the same work sequentially, since each subagent maintains its own context.
| Scenario | Why subagents help |
|---|---|
| Review of 5 files | Each file is reviewed in parallel rather than sequentially |
| Test generation (3 modules) | Each module gets its own subagent |
| Multi-file refactoring | Independent files are refactored simultaneously |
| Large codebase search | The search is split across several subagents |
Each subagent inherits the project context: skills, CLAUDE.md, and commands. It runs with the project's permissions, and sandbox mode is a separate opt-in setting you can enable when you want stricter isolation. For automated workflows, see the guide on headless mode and CI/CD.
In practice, tasks that touch several independent files benefit the most from subagent parallelization. The orchestration is automatic, so you do not have to manage the distribution.
Discover concrete examples of subagents in action in our documented use case gallery.
Key takeaway: subagents parallelize complex tasks and deliver substantial time savings. Claude Code orchestrates them automatically.
Can Claude Code be extended with plugins and a marketplace?
The MCP (Model Context Protocol) is the Claude Code extension system for integrating external tools. An MCP server is a plugin that exposes additional capabilities: database access, API querying, or specialized file reading.
Configure an MCP server in your project's .mcp.json file (or via claude mcp add):
{
 "mcpServers": {
 "postgres": {
 "command": "npx",
 "args": ["-y", "@modelcontextprotocol/server-postgres"],
 "env": {
 "DATABASE_URL": "postgresql://localhost:5432/mydb"
 }
 }
 }
}
Hundreds of community servers are available. You can create your own MCP server in TypeScript or Python. The ecosystem covers databases, monitoring, cloud services, and documentation systems.
To avoid the most common configuration errors, see the common errors with commands and plugins guide which covers MCP connection issues.
Always verify the source of an MCP server before installation. An unverified server could access your files and environment variables. Check the official MCP registry for reliable community servers.
The advanced best practices for Claude Code detail recommended MCP configurations for enterprise use, including access compartmentalization.
Claude Code also has a native plugin system. Install a plugin with the marketplace-qualified form claude plugin install , for example claude plugin install code-review@claude-plugins-official. The /plugin command in an interactive session, along with the claude plugin subcommands, manages your installed plugins.
Key takeaway: MCP and the native plugin system extend Claude Code. Hundreds of community MCP servers exist, and you can create your own in TypeScript or Python.
How to automate deterministic actions with hooks?
A hook is a shell script triggered automatically by Claude Code during specific events. Unlike skills that influence AI behavior and manually invoked commands, hooks execute deterministic code on every occurrence of an event.
Configure your hooks in .claude/settings.json:
{
 "hooks": {
 "PreToolUse": [
 {
 "matcher": "Edit",
 "hooks": [
 { "type": "command", "command": "echo 'Modification detected'" }
 ]
 }
 ],
 "PostToolUse": [
 {
 "matcher": "Bash",
 "hooks": [
 { "type": "command", "command": "npm run lint" }
 ]
 }
 ]
 }
}
Claude Code supports many hook events, including:
PreToolUse: triggers before tool executionPostToolUse: triggers after tool executionUserPromptSubmit: triggers when the user submits a promptSessionStart: triggers at session startupStop: triggers at the end of Claude's responseNotification: triggers on system messagesSubagentStart/SubagentStop: triggers on subagent launch and stopTaskCreated/TaskCompleted: triggers on task creation and completion
Other available events: StopFailure, TeammateIdle, ConfigChange, CwdChanged, FileChanged, PreCompact, PostCompact, WorktreeCreate, WorktreeRemove, SessionEnd, Elicitation, ElicitationResult, InstructionsLoaded, PermissionRequest, PostToolUseFailure.
Each hook uses the "matcher" field (an exact tool name, pipe-separated list, or regex) to target a tool, an optional "if" field for fine-grained filtering, and a "hooks" array with entries of type command, prompt, agent, or http. Exit codes determine behavior: 0 allows, 2 blocks, any other code allows and logs.
Here is how a post-tool-use hook on the Edit tool automatically runs ESLint (v9.x) after each file modification. This approach ensures the code complies with your rules without manual intervention.
| Event | Trigger | Typical use case |
|---|---|---|
PreToolUse | Before each tool | Validation, logging, blocking |
PostToolUse | After each tool | Linting, formatting, tests |
Notification | System message | Slack alerts, journaling |
Stop | End of session | Cleanup, session report |
For ready-to-use hook recipes, see the advanced configuration tips. Hooks guarantee deterministic execution: the script runs systematically, without depending on AI interpretation.
Key takeaway: hooks execute deterministic code on specific events: use them for automatic linting, logging, and mandatory validations.
Should you combine skills, hooks, and subagents for an optimal workflow?
The power of Claude Code lies in combining these mechanisms. Here is how to assemble them for a complete development workflow:
- Define your skills to teach your conventions at startup
- Create slash commands for your frequent actions
- Configure hooks for mandatory automatic checks
- Let subagents parallelize tasks involving multiple files
- Integrate MCP servers to connect your external tools
A typical enterprise workflow uses a handful of skills, a dozen or so custom commands, and a few hooks. This kind of configuration meaningfully reduces development time on React and Node.js projects.
If you are getting started, begin with installing and first launching Claude Code, then follow the guide on your first conversations before configuring advanced commands.
To master these concepts in real-world conditions, the Claude Code training from SFEIR offers a full day of hands-on labs. You will create your own commands, skills, and hooks on a concrete project, and leave with a reusable configuration kit.
The AI-Augmented Developer 2-day training covers advanced subagent orchestration and MCP integration in production architectures. To go deeper into multi-agent workflows, the AI-Augmented Developer -- Advanced 1-day training details hook strategies for CI/CD and large-scale subagent coordination.
Key takeaway: combine skills (conventions), commands (actions), hooks (automation) and subagents (parallelization) for a workflow that delivers significant productivity gains.
How to debug and optimize your custom commands?
Debugging custom commands starts with verifying the file location and syntax. Check that your file is in .claude/commands/ with the .md extension.
See the FAQ dedicated to commands and skills for answers to the most frequent questions about loading issues.
Here are the most common errors you will encounter:
- File placed in
.claude/instead of.claude/commands/ - Incorrect extension (
.txtinstead of.md) $ARGUMENTSvariable misspelled in the prompt- Skill listing text (combined
descriptionandwhen_to_use) exceeding the 1,536-character cap - Name conflict between project command and personal command
- Unescaped special characters in the prompt
Optimize your prompts by keeping them concise and focused. When a prompt grows very long, split it into multiple commands or use a complementary skill.
Concretely, type / in Claude Code to check that your commands are detected in the autocomplete. Test the prompt directly in a conversation to isolate the problem.
Key takeaway: check the location, extension, and size of your command files. Type / to verify detection.
Recent articles about Claude
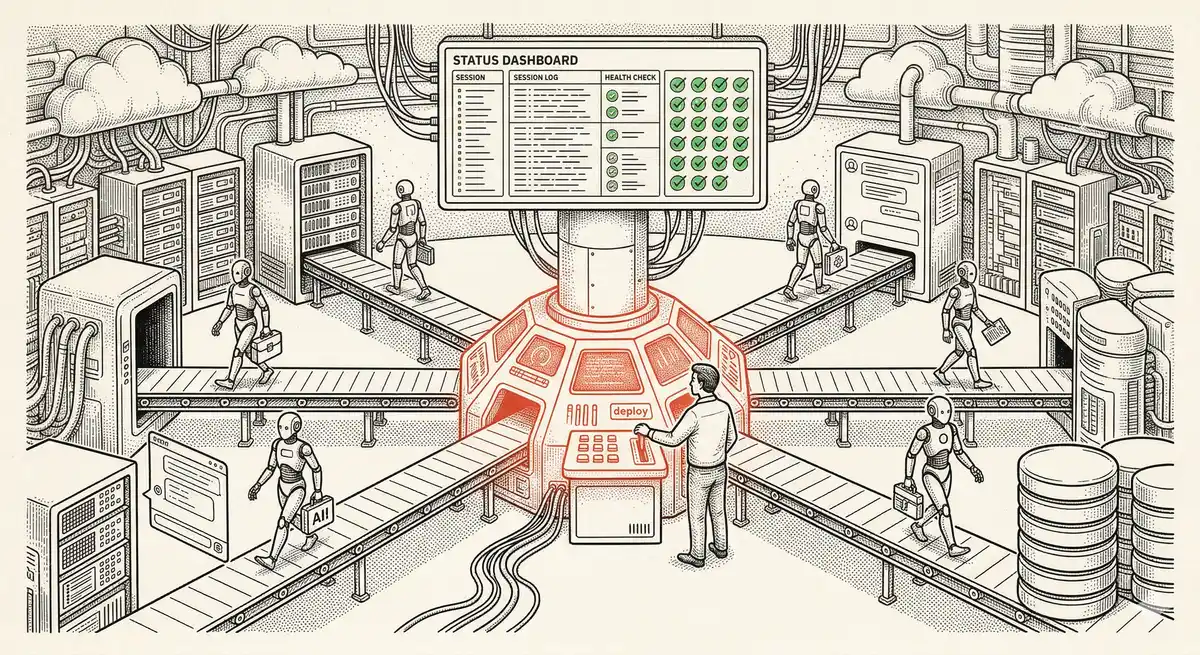
Claude Managed Agents: Anthropic's Platform for Production Agent Deployment
Anthropic launches Managed Agents: a cloud platform for deploying AI agents in production. Secure sandbox, checkpointing, multi-agent, autonomous sessions lasting hours. Notion, Rakuten, Asana and Sentry already use it.
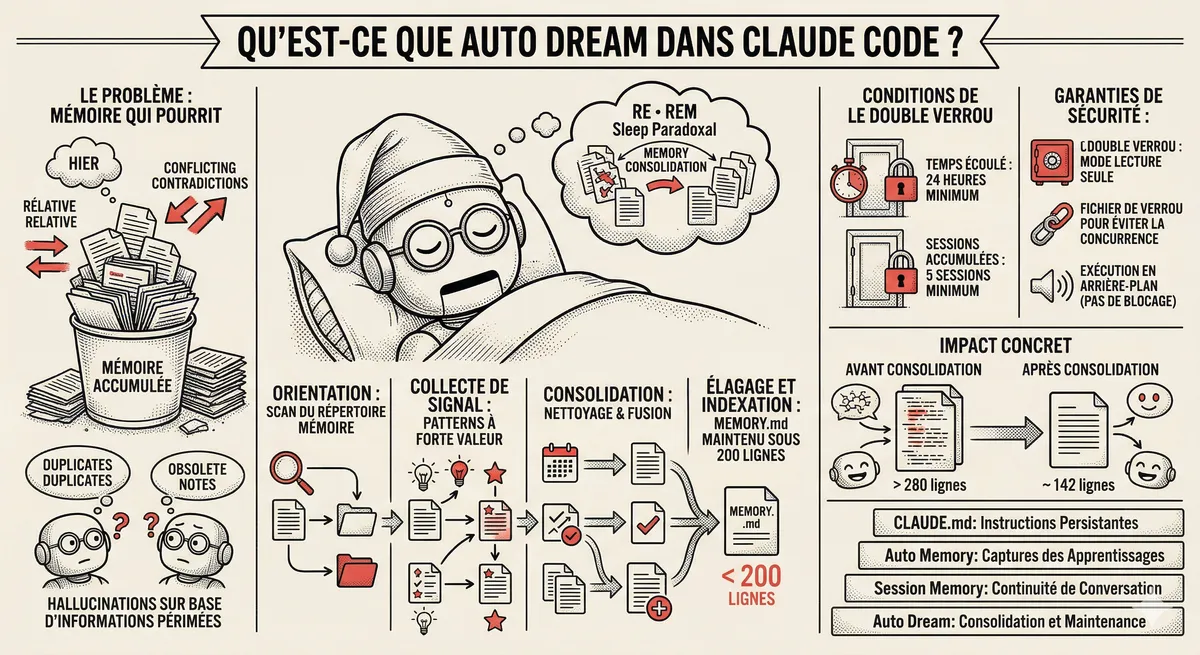
Claude Code Dream & Auto Dream: Automatic Memory Consolidation
After 20 sessions, Auto Memory notes become a mess. Auto Dream solves this by automatically consolidating Claude Code's memory: deduplication, stale entry removal, relative-to-absolute date conversion.
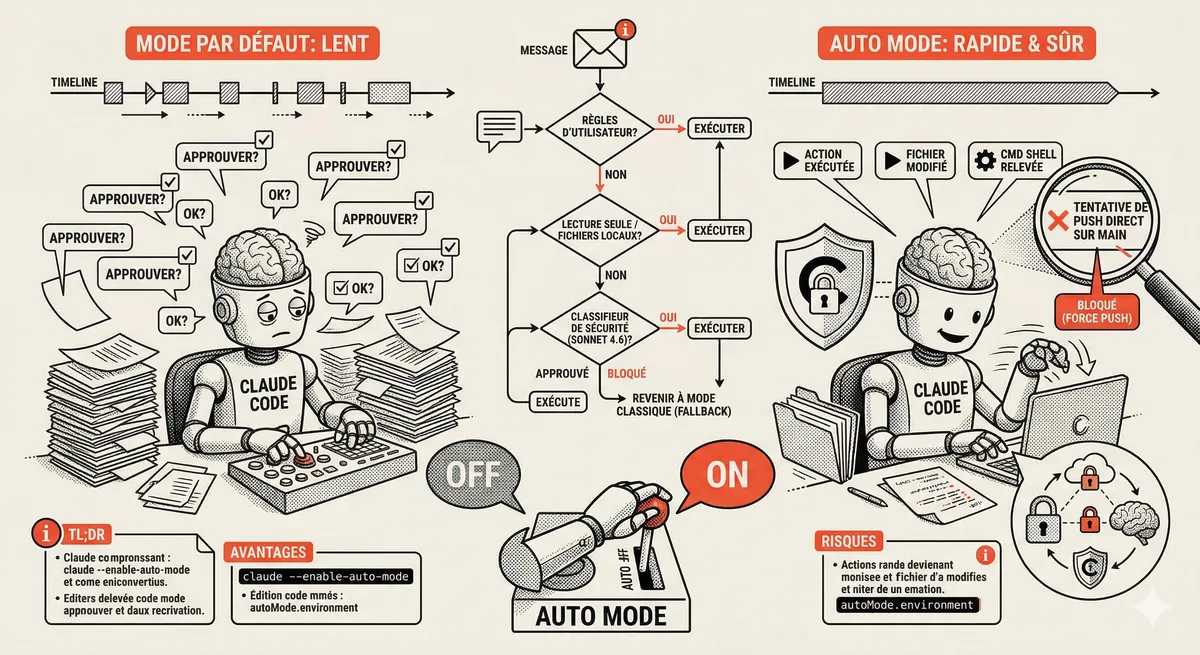
Claude Code Auto Mode: Autonomy Without the Risk
Auto Mode in Claude Code eliminates permission interruptions while keeping a safety net. A classifier analyzes every action before execution and blocks destructive operations. The sweet spot between approving everything and letting everything through.
This topic is covered in Module 5 of our Claude Code training
Sub-agents and Skills
1-day training • 60% hands-on labs • Expert instructors
View full program