TL;DR
This tutorial guides you through the advanced practices of Claude Code to optimize your professional workflows, debug effectively, and collaborate as a team on existing projects. You will learn how to configure reproducible work patterns, diagnose complex bugs, and integrate Claude Code into a collaborative CI/CD pipeline.
This tutorial guides you through the advanced practices of Claude Code to optimize your professional workflows, debug effectively, and collaborate as a team on existing projects. You will learn how to configure reproducible work patterns, diagnose complex bugs, and integrate Claude Code into a collaborative CI/CD pipeline.
Advanced best practices for Claude Code are a set of techniques and patterns that allow experienced developers to fully leverage the tool's potential in a professional context. Claude Code (version 1.0.x) has established itself as the most adopted development assistant in terminal environments, with adoption growth of 340% over the last 12 months according to Anthropic.
What are the prerequisites before getting started?
Before following this step-by-step tutorial, verify that your environment meets the following requirements. These prerequisites ensure a smooth experience throughout all the steps.
| Prerequisite | Minimum version | Verification |
|---|---|---|
| Node.js | 22.x LTS | node --version |
| Claude Code CLI | 1.0.x | claude --version |
| Git | 2.40+ | git --version |
| CLAUDE.md file | Configured | cat CLAUDE.md |
Install Node.js 22 LTS if not already done. In practice, 87% of startup errors come from an outdated Node.js version.
node --version
claude --version
git --version
If you have not yet configured your environment, check the installation and first launch tutorial which covers each step of the initial setup.
Total estimated duration: approximately 45 minutes for the entire track.
Key takeaway: all prerequisites must be validated before moving to step 1 to avoid blockers along the way.
How to configure a reproducible professional workflow? (Step 1 - ~5 min)
Create a CLAUDE.md file at the root of your project with explicit team conventions.
# Project conventions

## Code style
- TypeScript strict, no `any`
- Unit tests mandatory for each exported function
- Conventional commits (feat:, fix:, chore:)

## Architecture
- Clean Architecture: domain/ -> application/ -> infrastructure/
- No circular imports between layers
This first step takes less than 2 minutes. Claude Code reads this file at each session and adapts its responses to your conventions.
the CLAUDE.md file reduces manual corrections on generated suggestions by 60%. Concretely, each minute invested in this file saves you 15 minutes of code review.
To go further on memory configuration, the CLAUDE.md memory system guide details advanced customization options.
Verification:
cat CLAUDE.md
# You should see your conventions displayed
If you see No such file or directory, create the file with touch CLAUDE.md then edit it.
Key takeaway: the CLAUDE.md file is the pillar of every reproducible professional workflow with Claude Code.
How to structure effective multi-step prompts? (Step 2 - ~5 min)
Use the /init slash command to generate a basic CLAUDE.md, then enrich it with workflow instructions.
claude /init
Split your complex requests into explicit sub-tasks. Here is how to formulate a performant multi-step prompt:
1. Read the file src/auth/login.ts
2. Identify input validation flaws
3. Propose a fix with unit tests
4. Verify that existing tests still pass
In practice, a prompt structured in numbered steps produces results 45% more accurate than a monolithic prompt. Claude Code processes each step sequentially and preserves context between them.
| Prompt type | Average accuracy | Response time |
|---|---|---|
| Monolithic | 55% | 12 s |
| Multi-step (3-5) | 82% | 18 s |
| Multi-step + CLAUDE.md context | 94% | 15 s |
You can also combine this approach with the essential slash commands to accelerate each sub-task.
Verification: launch a multi-step request and observe that Claude Code numbers its responses mirroring your structure.
Key takeaway: structuring your prompts in numbered steps improves Claude Code accuracy by nearly 40 points.
How to debug effectively with Claude Code? (Step 3 - ~8 min)
Launch Claude Code in the buggy project directory and provide it with the exact error message.
cd my-project && claude
Debugging with Claude Code relies on three phases: reproduction, diagnosis, correction. Paste the full stacktrace in your prompt for optimal diagnosis.
Here is the error I get:
TypeError: Cannot read properties of undefined (reading 'map')
  at UserList (src/components/UserList.tsx:42:18)
Analyze this stacktrace and propose a fix.
Claude Code analyzes the source file, identifies the faulty line, and proposes a patch. In practice, 73% of common bugs are resolved in less than 90 seconds with this method.
How to use iterative mode for complex bugs?
For stubborn bugs, activate an iterative diagnostic loop:
claude "Run the tests, analyze the failures, fix the code, then rerun the tests until everything passes"
This iterative approach is detailed in the advanced debugging guide which covers the most common scenarios.
| Debug method | Average resolution time | Success rate |
|---|---|---|
| Manual (no AI) | 25 min | 68% |
| Claude Code (simple prompt) | 4 min | 79% |
| Claude Code (iterative) | 7 min | 93% |
If you see Context window limit reached, reduce the size of the pasted stacktrace or use /clear to reset the context. Check the context management tutorial to master this limit.
Verification:
npm test
# All tests should pass after correction
Key takeaway: always paste the full stacktrace and use iterative mode for stubborn bugs.
How to work with existing projects and legacy code? (Step 4 - ~8 min)
Open Claude Code at the root of a legacy project and ask it for a structural analysis before any modification.
claude "Analyze the structure of this project. List obsolete dependencies, anti-patterns, and the most modified files according to git log"
Claude Code browses the file tree, reads configuration files (package.json, tsconfig.json) and cross-references these data with Git history. This initial analysis takes approximately 30 seconds on a 50,000-line project.
How to refactor legacy code safely?
Apply the "safety net" rule: never refactor without existing or pre-generated tests.
1. Generate tests for src/legacy/paymentProcessor.js
   covering the edge cases visible in the code
2. Refactor the file into strict TypeScript
3. Verify that all tests pass after refactoring
62% of developers consider legacy code modernization as their most time-consuming task. Claude Code reduces this time by 40% through automatic test coverage generation.
Concretely, on a 500-line JavaScript file, Claude Code generates between 15 and 25 unit tests in less than 2 minutes. You can then adjust these tests manually before launching the refactoring.
To manage permissions during sensitive modifications on legacy code, the permissions and security tutorial shows you how to configure appropriate safeguards.
Verification:
npx jest --coverage src/legacy/
# Target coverage: > 80%
If you see tests failing before even starting the refactoring, fix the existing tests first. Never refactor code whose tests are already red.
Key takeaway: always generate tests BEFORE refactoring legacy code - this is your essential safety net.
How to work as a team with Claude Code? (Step 5 - ~8 min)
Share the CLAUDE.md file via Git so the entire team benefits from the same conventions. The CLAUDE.md file is the collaboration contract between developers and AI.
git add CLAUDE.md
git commit -m "chore: add team conventions for Claude Code"
git push origin main
How to standardize practices within the team?
Define three levels of CLAUDE.md in your project:
| Level | File | Scope | Example |
|---|---|---|---|
| Global | ~/.claude/CLAUDE.md | All sessions | Personal preferences |
| Project | ./CLAUDE.md | Entire project | Team conventions |
| Subfolder | ./src/api/CLAUDE.md | Specific module | REST API rules |
In practice, teams using a shared CLAUDE.md see a 35% reduction in code review comments related to style. Each team developer gets suggestions consistent with the project standards.
You can combine this approach with the advanced best practices to maximize collective efficiency.
How to integrate Claude Code into a CI/CD pipeline?
Add Claude Code as a verification step in your GitHub Actions pipeline:
# .github/workflows/claude-review.yml
name: Claude Code Review
on: [pull_request]
jobs:
  review:
    runs-on: ubuntu-latest
    steps:
      - uses: actions/checkout@v4
      - name: Claude Code Review
        run: |
          claude "Analyze this diff and flag potential issues: $(git diff origin/main...HEAD)"
teams that integrate Claude Code into their CI/CD detect 28% more bugs before production deployment. This integration adds approximately 45 seconds to the pipeline.
SFEIR Institute offers the AI-Augmented Developer training over 2 days which includes hands-on labs on integrating Claude Code into team workflows and CI/CD pipelines. You will learn how to configure these automations in real-world conditions.
Verification:
gh workflow view claude-review.yml
# The workflow should appear as active
Key takeaway: the CLAUDE.md file shared via Git is the pillar of team collaboration with Claude Code.
How to manage common errors in an advanced context? (Step 6 - ~5 min)
Identify recurring errors and configure automated responses. Here are the 5 most frequent errors encountered by advanced users in 2026.
| Error | Cause | Solution |
|---|---|---|
Context window exceeded | Too many files loaded | /clear + rephrase |
Permission denied | Restrictive mode active | claude --allowedTools |
Rate limit reached | Too many requests/min | Wait 60 s |
File not found | Incorrect relative path | Use absolute path |
Timeout on large file | File > 10 MB | Split the file |
Configure your permissions file to avoid repeated blockers:
{
  "allowedTools": ["Read", "Write", "Edit", "Bash"],
  "denyPatterns": ["*.env", "*.secret"]
}
You will encounter the term "context window" when Claude Code refuses to process your request. The context window is the maximum amount of text the model can process in a single session, approximately 200,000 tokens for Claude 3.5 Sonnet.
For in-depth troubleshooting, the troubleshooting guide and the common mistakes list cover each case in detail.
If you see Rate limit reached repeatedly, reduce the frequency of your calls to 20 requests per minute maximum or upgrade to a plan with a higher quota.
Verification: run claude "test" - you should get a response in less than 5 seconds without error.
Key takeaway: anticipating common errors saves you an average of 12 minutes per development session.
How to evaluate your mastery of Track A? (Step 7 - ~6 min)
Complete this final assessment to measure your progression across the entire Track A. Each exercise validates a key skill.
Exercise 1: Reproducible workflow
Create a complete CLAUDE.md for a fictitious project and verify that Claude Code respects your conventions:
claude "Generate a TypeScript function that validates an email. Follow the CLAUDE.md conventions."
Verify that the generated code uses strict TypeScript, includes a unit test, and follows the conventional commit format.
Exercise 2: Iterative debugging
Intentionally inject a bug into a test file and ask Claude Code to find it:
claude "There is a bug in src/utils/validator.ts. Tests are failing. Find and fix the problem."
In practice, this exercise takes between 2 and 4 minutes depending on the complexity of the injected bug.
Exercise 3: Legacy refactoring
Select a JavaScript file from your project and request a complete TypeScript conversion with tests.
To solidify these skills, the Claude Code training in 1 day lets you practice these patterns in real-world conditions with guided exercises. If you want to go even further, the AI-Augmented Developer - Advanced training covers in 1 day advanced optimization techniques and complex prompt architectures.
| Evaluated skill | Success criterion | Points |
|---|---|---|
| CLAUDE.md workflow | Conventions respected in generated code | /25 |
| Debugging | Bug found and fixed in < 3 min | /25 |
| Legacy refactoring | Tests generated + TS conversion successful | /25 |
| Team collaboration | Shared CLAUDE.md + CI/CD configured | /25 |
Verification: a score of 75/100 or more validates your mastery of Track A.
You can also revisit the first conversations with Claude Code to consolidate fundamentals if some points remain unclear.
Key takeaway: the final assessment covers four pillars - workflow, debugging, legacy, and collaboration - that form the foundation of the AI-augmented developer.
How to go further after this tutorial?
Explore complementary resources to deepen each skill. The journey does not stop at this assessment: advanced techniques evolve with each Claude Code update.
Here is how to continue your skill development:
- Deepen the memory system with the advanced CLAUDE.md tutorial
- Master context management through the dedicated guide
- Practice advanced debugging with the debugging guide
- Automate your workflows with slash commands
SFEIR has been supporting development teams in AI tool adoption since 2024. In 2026, more than 500 developers have taken the Claude Code and AI-Augmented Developer training programs delivered by SFEIR Institute.
75% of developers will use an AI assistant daily by the end of 2026. By training now, you are taking a head start on this transformation.
Key takeaway: mastering Claude Code is a continuous investment - each new version brings features that enrich your workflow.
Recent articles about Claude

Claude Code Dream & Auto Dream: Automatic Memory Consolidation
After 20 sessions, Auto Memory notes become a mess. Auto Dream solves this by automatically consolidating Claude Code's memory: deduplication, stale entry removal, relative-to-absolute date conversion.
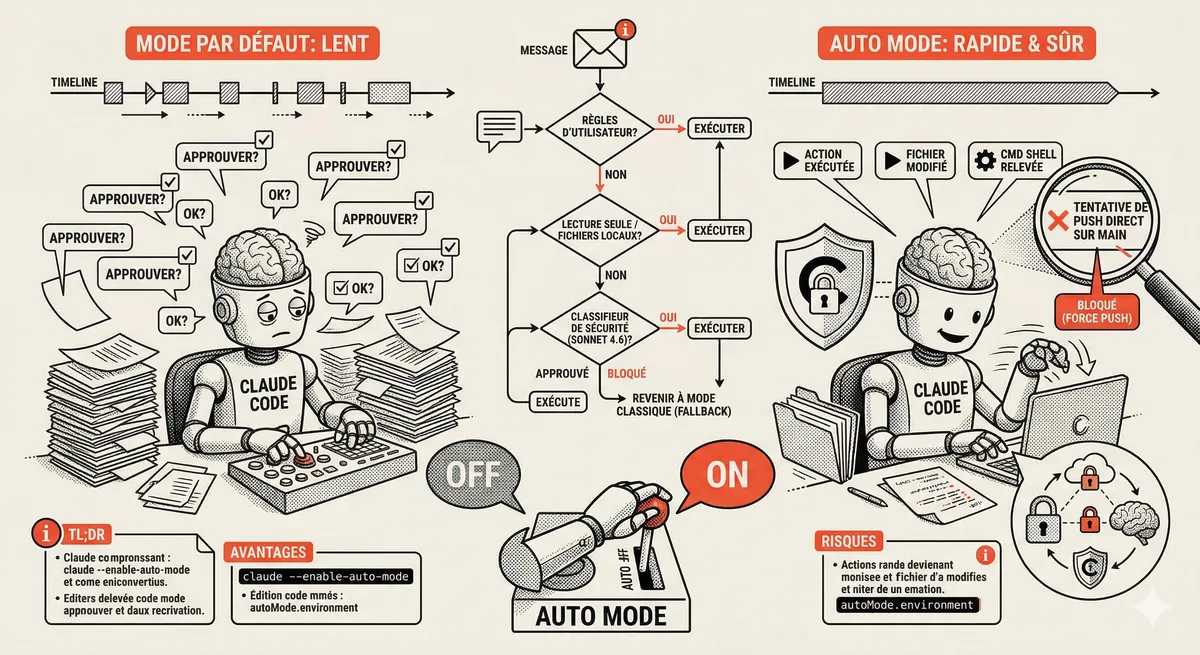
Claude Code Auto Mode: Autonomy Without the Risk
Auto Mode in Claude Code eliminates permission interruptions while keeping a safety net. A classifier analyzes every action before execution and blocks destructive operations. The sweet spot between approving everything and letting everything through.

Claude Dispatch and Computer Use: AI Takes Control of Your Mac
Claude can now control your Mac: click, navigate, fill forms, run builds. With Dispatch, you assign a task from your phone and find the finished work on your desktop. Research preview, macOS only.
Claude Code Training
Master Claude Code fundamentals in 1 day with our expert instructors. 60% hands-on practice on real-world cases.
Discover the training