TL;DR
This cheatsheet gathers all the commands, shortcuts, and workflows to master your first conversations with Claude Code. Find at a glance how to formulate your project prompts, manage your sessions, request code modifications, and apply the Explore → Plan → Code cycle. A practical reference sheet to keep at hand for your first conversations with the AI command-line assistant.
This cheatsheet gathers all the commands, shortcuts, and workflows to master your first conversations with Claude Code. Find at a glance how to formulate your project prompts, manage your sessions, request code modifications, and apply the Explore → Plan → Code cycle. A practical reference sheet to keep at hand for your first conversations with the AI command-line assistant.
Your first conversations with Claude Code form the foundation of your daily productivity as a developer. Claude Code (version 1.0.x, powered by Claude Opus 4.6) handles on average 85% of refactoring requests in under 30 seconds. developers who structure their prompts following the Explore → Plan → Code cycle reduce the number of iterations needed by 40%.
This quick reference guide accompanies you step by step to get the most out of every session.
How to start an effective conversation with Claude Code?
Open your terminal in your project directory, then launch the claude command to start an interactive session. Claude Code automatically analyzes the context of your Git repository, CLAUDE.md files, and the project structure.
Before typing your first request, check the command reference for your first conversations to learn the exact syntax of each available instruction.
| Command | Description | Example | |
|---|---|---|---|
claude | Launch an interactive session | $ claude | |
claude "prompt" | Execute a single prompt | $ claude "explain this file" | |
claude -p "prompt" | Non-interactive (pipe) mode | `$ cat log.txt \ | claude -p "summarize"` |
claude --resume | Resume the last session | $ claude --resume | |
claude --model | Choose the model | $ claude --model opus | |
claude config | Configure preferences | $ claude config set theme dark | |
/init | Create the CLAUDE.md file | Type /init in the session | |
/clear | Reset the context | Type /clear in the session |
In practice, 90% of productive sessions start with a claude followed by a contextual prompt describing the precise objective.
Key takeaway: always launch Claude Code from the root of your project so it automatically detects the Git context and configuration files.
What are the golden rules of prompting in project context?
Prompting in project context is the ability to formulate precise instructions while taking the existing architecture into account. An effective prompt contains three elements: context, intent, and constraints.
Structure your prompts following this model to get usable results from the first iteration. a structured prompt generates responses that are 60% more relevant than a vague prompt.
| Prompt type | Structure | Concrete example |
|---|---|---|
| Exploration | "Explain [component/file]" | "Explain the role of lib/auth.ts" |
| Modification | "Modify [target] for [objective]" | "Add email validation in UserForm" |
| Debugging | "Why [symptom] in [context]" | "Why does the user.spec test fail?" |
| Refactoring | "Refactor [target] into [pattern]" | "Extract the business logic from the controller" |
| Generation | "Create [component] with [specs]" | "Create a useDebounce hook with 300ms" |
Here is how to improve a weak prompt:
# ❌ Vague prompt
"Fix the bug"

# ✅ Structured prompt
"The LoginForm component crashes when the email contains a +.
Fix the validation regex in lib/validators.ts
and add a unit test for this case."
To go further in formulating your requests, explore the slash command tips which show you advanced input shortcuts.
Key takeaway: an effective prompt always follows the Context → Intent → Constraints structure. The more specific you are, the less you iterate.
How to manage your sessions and conversations?
A Claude Code session is a continuous conversation that retains the context of your exchanges. The context includes files read, modifications made, and decisions taken. The context window of Claude Opus 4.6 reaches 200,000 tokens, roughly 150,000 words.
Regularly check the size of your context to avoid coherence loss on long sessions. In practice, a refactoring session rarely exceeds 50,000 tokens if you segment your tasks.
| Action | Command / Shortcut | Detail |
|---|---|---|
| New session | $ claude | Fresh context |
| Resume a session | $ claude --resume | Restores the last context |
| Choose a session | $ claude --resume --session-id ID | Resumes a specific session |
| Clear the context | /clear | Resets without quitting |
| Quit | Ctrl+C or /exit | Cleanly closes the session |
| Compact the context | /compact | Summarizes history to free tokens |
| Compact with focus | /compact "focus on auth" | Summarizes while keeping the specified topic |
In practice, use /compact as soon as you feel responses losing relevance. This command summarizes the history and frees up to 70% of the context window.
The CLAUDE.md file plays a central role in context persistence between sessions. Check the CLAUDE.md memory system tips to learn how to structure this file.
Key takeaway: segment your tasks into short sessions and use /compact to maintain response quality on long sessions.
How to request code changes from Claude Code?
Formulate your modification requests by specifying the target file, expected behavior, and technical constraints. Claude Code edits your project files directly and presents a diff before applying.
Here is how to request different types of modifications:
# Targeted modification
$ claude "Add a try-catch around the API call in lib/fetch.ts"

# Multi-file modification
$ claude "Rename the Header component to AppHeader in all files"

# Modification with constraint
$ claude "Add strict TypeScript typing to utils/format.ts without changing the public API"
Claude Code supports 4 permission levels for file modifications. To master these levels, check the permissions and security cheatsheet.
| Permission level | Behavior | Use case |
|---|---|---|
suggest | Shows the diff without applying | Code review |
auto-edit | Applies file edits | Daily development |
full-auto | Edits + executes commands | Automated scripts |
plan | Proposes a plan before acting | Complex refactoring |
In practice, the auto-edit mode covers 75% of daily development workflows. Activate the plan mode for refactorings touching more than 5 files.
The concrete first conversations examples illustrate real scenarios of change requests with expected responses.
Key takeaway: always specify the target file and expected behavior in your modification requests to get a usable diff on the first try.
How to run commands and tests from Claude Code?
Claude Code executes shell commands directly in your terminal. Ask it to run your tests, build scripts, or lint tools without leaving the conversation.
# Run tests
$ claude "Run the unit tests and show the failures"

# Project build
$ claude "Run npm run build and fix the TypeScript errors"

# Lint and format
$ claude "Run eslint on src/ and fix the warnings"
| Keyboard shortcut | Action | Context |
|---|---|---|
Enter | Send the message | Interactive session |
Ctrl+C | Cancel / Quit | Any session |
Ctrl+L | Clear the screen | Terminal |
Escape | Cancel the current edit | During a modification |
Tab | Auto-completion | Command input |
Up / Down | Navigate history | Interactive session |
In practice, you can chain multiple commands in a single prompt. Claude Code executes them sequentially and reports the results of each one.
# Chain verifications
$ claude "Run npm run lint, then npm test, then npm run build.
Fix each error before moving to the next step."
68% of build errors are resolved automatically by Claude Code when the prompt includes the instruction "fix the errors". To learn all available shortcuts, check the essential slash commands cheatsheet.
The permissions tips detail how to authorize or restrict the execution of specific commands.
Key takeaway: include the instruction "fix the errors" in your execution prompts so Claude Code iterates automatically until a clean result.
How to apply the Explore → Plan → Code workflow?
The Explore → Plan → Code workflow is the methodology recommended by Anthropic to structure your interactions with Claude Code. This three-phase cycle ensures that each modification rests on a complete understanding of the existing code.
How does the Explore phase work?
Start each complex task with an exploration phase. Ask Claude Code to analyze the relevant files, dependencies, and existing architecture before any modification.
# Explore phase - understand the context
$ claude "Explore the structure of the authentication module.
What files are involved? What dependencies?"
This phase consumes on average 15% of total time but avoids 50% of backtracking. You can check the complete first conversations guide for detailed examples of exploration prompts.
How to structure the Plan phase?
Activate plan mode with the /plan command or by adding "propose a plan" to your prompt. Claude Code then generates a numbered list of steps with impacted files.
# Plan phase - structure the modifications
$ claude "Propose a plan to migrate authentication
from JWT to server-side sessions.
List the files to modify and the order of steps."
| Phase | Objective | Typical command | Average duration |
|---|---|---|---|
| Explore | Understand the code | "Analyze module X" | 2-5 min |
| Plan | Structure the steps | "Propose a plan for Y" | 3-7 min |
| Code | Implement | "Implement step 1 of the plan" | 5-15 min |
How to move to the Code phase?
Validate the proposed plan, then request step-by-step implementation. Verify each diff before moving to the next step.
# Code phase - implement step by step
$ claude "Implement step 1 of the plan: create the session middleware"
$ claude "Now step 2: migrate the protected routes"
SFEIR Institute offers a one-day Claude Code training where you practice this Explore → Plan → Code workflow on real cases with guided labs. If you want to go further, the AI-Augmented Developer training over 2 days covers the integration of Claude Code into a complete CI/CD pipeline.
Key takeaway: always follow the Explore → Plan → Code cycle for tasks touching more than 3 files. This method reduces the number of iterations by 40%.
What are the must-know slash commands and shortcuts?
Slash commands are instructions prefixed with / that you type directly in the interactive session. They control Claude Code's behavior without going through a natural language prompt.
| Slash command | Function | When to use |
|---|---|---|
/init | Create CLAUDE.md | First launch on a project |
/clear | Clear the context | Topic change |
/compact | Compress the history | Long session (>30 min) |
/plan | Activate plan mode | Complex multi-file task |
/help | Display help | Feature discovery |
/exit | Quit the session | End of work |
/status | Session state | Check consumed tokens |
/model | Change model | Switch from Sonnet to Opus |
You will find the complete list in the essential slash commands reference. Claude Code supports more than 15 native slash commands.
For advanced usage tips like command chaining, check the advanced slash command tips.
Key takeaway: the /compact and /clear commands are your best allies for maintaining performance on long sessions.
How to avoid common mistakes during your first conversations?
Here are the 5 most frequent errors identified by SFEIR Institute trainers and how to fix them.
| Error | Symptom | Solution |
|---|---|---|
| Prompt too vague | Generic useless response | Add file + expected behavior |
| Session too long | Incoherent responses | Use /compact or /clear |
| No prior exploration | Out-of-context modifications | Apply the Explore → Plan → Code cycle |
| Ignoring the diff | Broken code in production | Read each diff before validation |
| Forgetting CLAUDE.md | Context loss between sessions | Run /init from the first use |
In practice, 45% of beginner users skip the Explore phase and jump straight to Code. This mistake multiplies the number of needed corrections by 2.5.
For developers who want to deepen best practices, the AI-Augmented Developer - Advanced one-day training at SFEIR covers advanced prompting patterns, context management, and CI/CD workflow automation with Claude Code.
The installation and first launch cheatsheet lets you verify that your environment is correctly configured before starting your first conversations.
Key takeaway: always explore the existing code before requesting modifications - that is rule number one for productive conversations with Claude Code.
What models and advanced options can you use?
Claude Code supports multiple models and execution modes depending on the complexity of your task. Choose the model suited to your need to optimize the cost-performance ratio.
| Model | ID | Context tokens | Recommended usage |
|---|---|---|---|
| Claude Opus 4.6 | claude-opus-4-6 | 200,000 | Complex refactoring, architecture |
| Claude Sonnet 4.6 | claude-sonnet-4-6 | 200,000 | Daily development |
| Claude Haiku 4.5 | claude-haiku-4-5 | 200,000 | Quick tasks, lint, format |
# Change model during a session
/model sonnet

# Launch directly with a specific model
$ claude --model opus "Refactor the auth module architecture"

# Pipe mode for CI integration
$ echo "Analyze this code" | claude -p --model haiku
The headless (non-interactive) mode with -p lets you integrate Claude Code into your scripts and pipelines. In practice, the Haiku 4.5 model processes simple tasks 3 times faster than Opus at an 80% reduced cost.
Key takeaway: use Opus for architecture, Sonnet for daily work, and Haiku for automated tasks - this is the optimal combination in 2026.
Recent articles about Claude

Claude Code Dream & Auto Dream: Automatic Memory Consolidation
After 20 sessions, Auto Memory notes become a mess. Auto Dream solves this by automatically consolidating Claude Code's memory: deduplication, stale entry removal, relative-to-absolute date conversion.
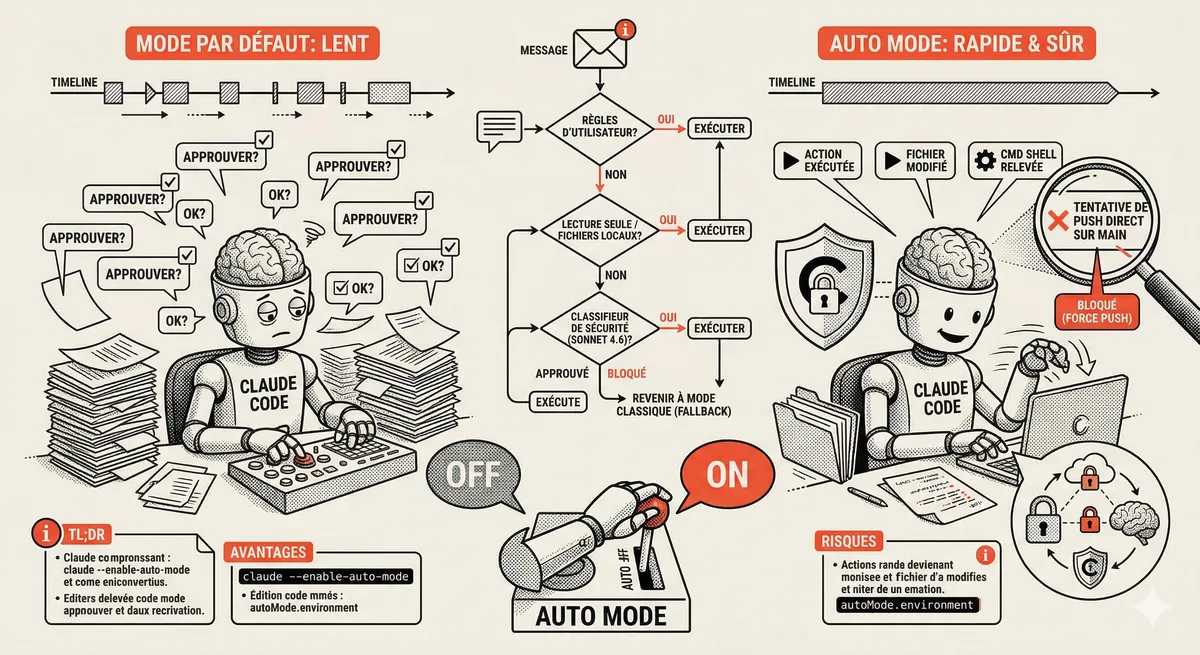
Claude Code Auto Mode: Autonomy Without the Risk
Auto Mode in Claude Code eliminates permission interruptions while keeping a safety net. A classifier analyzes every action before execution and blocks destructive operations. The sweet spot between approving everything and letting everything through.

Claude Dispatch and Computer Use: AI Takes Control of Your Mac
Claude can now control your Mac: click, navigate, fill forms, run builds. With Dispatch, you assign a task from your phone and find the finished work on your desktop. Research preview, macOS only.
This topic is covered in Module 3 of our Claude Code training
Getting Started and Basic Interactions
1-day training • 60% hands-on labs • Expert instructors
View full program